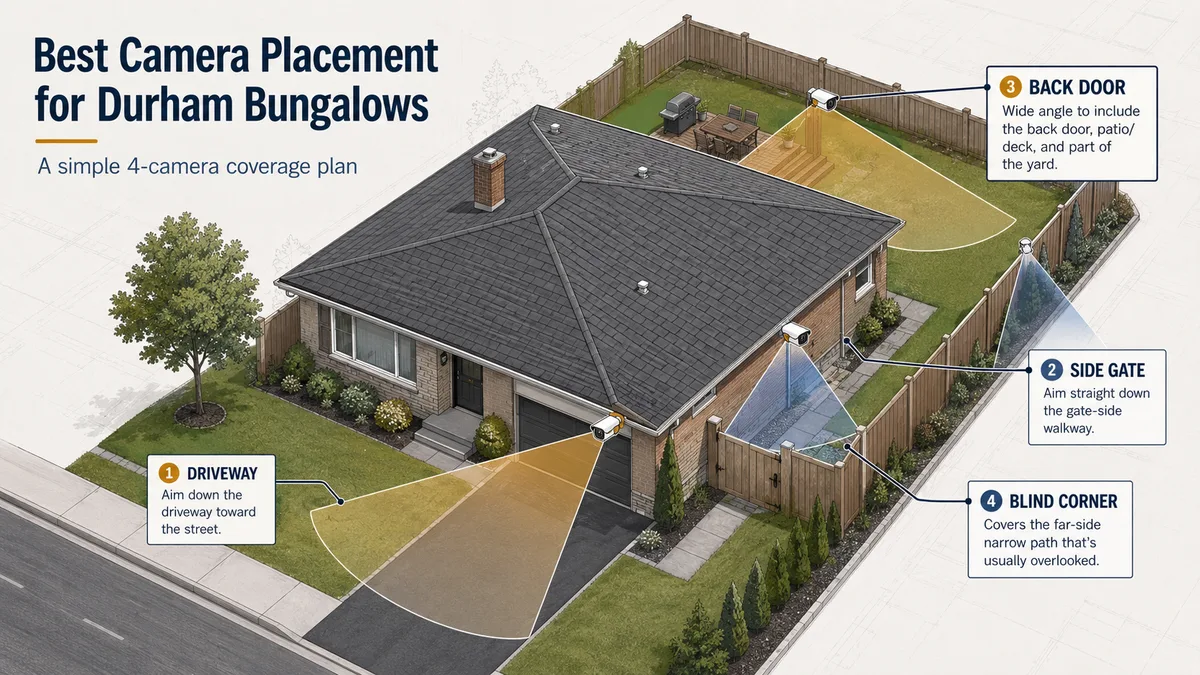
On a typical Durham bungalow, four cameras cover every entry point that matters: the driveway, the side gate, the back door, and one overlooked blind corner at the far side of the house. Place them in those four spots and you’ll have footage of every approach worth catching, without wasting a camera on angles that rarely pay off.
Key Takeaways
- Four cameras are enough for most single-storey Durham homes when placed at the driveway, side gate, back door, and the blind corner
- Residential break-ins most commonly involve side and rear entry points, according to Statistics Canada victimization data
- Mount cameras at 8-10 ft: high enough to avoid tampering, low enough to capture useful face and plate detail
- You can skip the front porch and the detached garage on a 4-camera plan without losing meaningful coverage
- Full-colour night-vision cameras are worth it at the side gate, where ambient light is lowest
Book your free in-home assessment to get a walk-through of your specific property before recommending anything.
The driveway camera comes first, and where exactly to mount it
The driveway is where almost every residential event begins. Statistics Canada’s General Social Survey on victimization reports that the front of the property is the initial approach route in the majority of reported property crimes (Statistics Canada, GSS Victimization Cycle 2019, catalogue 85-002-X). Mount the driveway camera first, and you answer the single most important question about any incident: who arrived, and in what vehicle.
On a typical Whitby or Bowmanville bungalow, the right spot is the front-facing soffit at the corner nearest the road. You want the camera angled down the driveway toward the street, not pointed at the front door. A front-door angle catches people who’ve already decided to knock. A driveway angle catches them 10 metres earlier, which is where the decision to proceed or back off usually happens.
Aim for plate reads, not selfies
Mount height matters a lot here. We put driveway cameras at 8 to 10 feet. Lower than 8 feet and someone can reposition the camera or put a hand over the lens. Higher than 10 feet and you lose plate-readable detail on the windshield approach. The sweet spot gets you the front plate of a car turning in from the street, plus a clear face shot on foot traffic passing within 4 metres of the lens.
When we sit down with homeowners after an incident, the footage that leads to an identification almost always comes from the driveway camera, not the front door. The plate is the detail that matters.
Check out why 4K resolution actually matters for licence plate reads if you’re weighing camera tiers before your assessment.
See our camera package tiers for a breakdown of what’s included at each level.
The side gate: the entry path nobody guards
The side gate is the single most-used uninvited entry point on Durham bungalows. Public Safety Canada’s home security guidance consistently identifies side and rear access as the primary entry routes for residential break-and-enters, noting that most occur when no one is visibly home (Public Safety Canada, Crime Prevention Through Environmental Design, 2013). On a bungalow, the side gate is the path that gets someone from the street to the backyard without passing a window.
Mount a camera on the side soffit looking straight down the gate-side walkway. You want to see the latch, the gate itself, and about 3 to 4 metres of the path on either side. That framing captures anyone who approaches the gate, opens it, or turns back after seeing the camera.
Why full-colour night vision earns its money here
The side of a bungalow is usually the darkest spot on the property at night. A street light at the front and a porch light at the back leave the middle in a gap. Standard black-and-white IR cameras work fine, but full-colour night-vision cameras produce footage with enough colour detail to describe clothing, hair, and vehicle colour in the dark. For the side gate specifically, that upgrade is worth it.
On many Durham bungalows, the side gate camera is the one that most often captures a face. The person has already committed to walking to the side of the house, so they haven’t thought to look up yet. A properly angled side-soffit camera gets a clear look at the walkway approach.
The back door, framed wide
Back doors are a priority for one reason: they’re the most concealed entry point on the property. Durham Regional Police Service annual statistics show that a significant proportion of residential break-and-enter incidents involve rear or side access, consistent with the national pattern (Durham Regional Police Service, Annual Statistical Report, 2023). At the back of a bungalow, there’s no street traffic, no passing neighbours, and often no sight line from any window.
Cover the back door from the top rear corner of the house. Wide is better than close here. You want the door in frame, the patio or deck, and at least 8 to 10 feet of yard extending toward the back fence. You’re not trying to read faces at the back door. You’re trying to record what happened: which direction someone came from, how long they were there, and what they carried out.
Detached garage or shed? Adjust the aim.
If your back yard has a detached garage or shed, the back-corner camera should split the angle so it covers both the door and the outbuilding. You’ll sacrifice some yard depth, but a detached garage is often the highest-value target on a bungalow property. Tools, bikes, and seasonal gear live there, and it’s often easier to access than the house. If the garage is far enough away that one camera can’t cover both properly, a fifth camera becomes the right call.
The blind corner everyone forgets
On almost every Durham bungalow we install, one corner has no camera coverage at all. It’s usually the far side of the house: the side opposite the driveway, the narrow path between the wall and the neighbour’s fence. No one walks there normally. That’s exactly why someone might.
The Insurance Bureau of Canada notes that homes with visible, well-placed security cameras see meaningful deterrence benefits, because a camera-free zone is an exploitable gap (Insurance Bureau of Canada, Home Security and Insurance, 2022). The blind corner is that gap on most bungalows. At minimum, angle your back-yard camera slightly toward this corner so it’s in the edge of frame.
If you’re doing a 4-camera plan, you don’t need a dedicated camera here. A back-corner camera with a wide-enough field of view, typically 90 to 100 degrees horizontal, will catch this path in the peripheral zone. It won’t be the clearest footage you’ll get, but it will establish presence, and presence is often enough.
See how we walk your property during an assessment for what that process looks like.
Mounting heights, cable runs, and the bits we get asked about most
On bungalow installs across Durham, the two most common installation questions come up before we even start drilling: how high, and where does the cable go?
How high should cameras be mounted?
Eight to ten feet is the standard for exterior cameras on a single-storey home. That range keeps cameras above casual reach while keeping the lens close enough to capture plate and face detail. Attic-height mounting, which you sometimes see on two-storey homes, doesn’t work well on bungalows because you lose too much detail looking nearly straight down.
On soffits, you’re almost always in that 8 to 10 foot range already. That’s one reason soffits are the default mount point for bungalow installs. The angle works, the surface is stable, and the cable can route into the attic space above without drilling through the exterior wall at all.
Where does the cable go?
On a bungalow with attic access, cables route up through the soffit and across the attic to the NVR location, usually a utility room, basement, or a closet near the router. This approach leaves no visible cable on the exterior. It also means we’re not drilling through finished walls inside the home in most cases.
Where the attic route isn’t viable, such as a flat-roof addition or a section with no attic space, we run cable along the soffit and down through the exterior wall at the NVR entry point. It’s slightly more visible but still clean, and we paint-match the faceplate on request.
See how our installation process works start to finish for a full picture of what install day looks like.
What you can skip on a 4-camera plan
Not every angle needs a camera. Knowing what to leave out is just as useful as knowing what to cover.
The front door. On a bungalow, the driveway camera already captures the front path and anyone approaching the door. A dedicated doorbell camera is nice for live check-ins, but it’s an add-on, not a placement priority. If you want the live-answer feature for packages and visitors, a doorbell camera add-on is the right call. Don’t burn one of your four cameras on the front porch.
Windows. Cameras pointed at windows record a lot of trees moving in the wind and very little useful activity. Windows are rarely the primary entry point on a Durham bungalow; doors and gates are. Window sensors on a separate system are a better tool for monitoring window breaches than a camera.
The neighbour’s driveway. Aim matters for a practical and legal reason. You have no obligation to record footage of your neighbour’s property, and it creates friction. We configure privacy zones in the NVR software on install day so the camera view stops at your property line. It takes five minutes and removes a conversation you don’t want to have.
The front fence line. Unless you have a gated front fence, there’s no entry point here worth a camera. The driveway covers the only meaningful approach from the front.
Frequently asked questions
Does it matter which direction my bungalow faces?
The four-position plan works on any orientation. What changes is where the “side opposite the driveway” is. On a north-facing bungalow in Whitby, the driveway is usually on the south-east and the blind corner is north-west. We trace the same logic regardless of street orientation. We map every position during the free in-home assessment before recommending anything.
Will 4K cameras actually capture a licence plate from the driveway?
Yes, at the right distance and angle. The plate-readable range for a 4K camera mounted at 8 to 10 feet, aimed down a standard Durham driveway, is roughly 8 to 12 metres. Most residential driveways in Bowmanville and Whitby are in that range. At longer driveways, we angle the camera earlier on the approach. Related: why 4K matters more than megapixel count alone.
Can I add a fifth camera later if I want to cover the garage separately?
Yes. The NVR we install has spare ports, and we stock the most common camera models. A fifth camera added later runs $199 installed (at the time of original install, bundling is cheaper than a separate trip). The cable route is much easier to add while we’re already on site, so if you’re on the fence about the garage, bring it up during the assessment. Related: full package options and add-on pricing.
What if I have a finished basement and no attic access on one section of the roof?
This comes up on bungalows with rear additions. We can still route cable cleanly: either through the exterior wall at one point, sealed and paint-matched, or along the soffit with a surface-mount raceway. We show you the planned route before we drill anything. You can redirect us if you don’t like it. See our full installation process.
Does camera placement affect my home insurance rate?
Sometimes. The Insurance Bureau of Canada notes that insurers may discount the property portion of a home insurance policy when a hardwired camera system is installed (Insurance Bureau of Canada, 2022). The discount varies by insurer and is typically 5 to 15%. We provide a system spec sheet after install that you can hand to your broker. Worth a five-minute call once we’re done. See our service area: we cover all of Durham Region.
We mark every camera position on a printed site plan before you sign anything. If you want, we’ll also walk you through actual footage from comparable Durham homes, with the owners’ permission, so you can see exactly what each angle gets you. That walkthrough is free, on-site, and takes about 30 minutes.